OneDrive and Office 365
Using MHCC OneDrive for Files
Many of us have Office documents we'd like to share with our students. These include Word, PowerPoint and Excel files students can use as study guides or resources. Attaching these documents to tools and pages in Blackboard requires students to download the files and launch software to view.
Don't Attach? Why Not?
Attaching files to Blackboard is frustrating to students. They end up with duplicate or triplicate downloads, trouble locating downloaded files, and roadblocks for those who don't have the software to open and view the documents or presentations. Students using tablets or similar devices are especially unequipped to handle Office documents.
Better for Students
Viewing these files in a browser is best for student usability and navigability because they open where students are as they navigate lessons. Typically, students should only download Word and PPT files they are expected to edit and resubmit to you. Even in these cases, a One Drive file can be linked for them, making your file management easier--read below.
Better for Instructors
Uploading and sharing files from OneDrive allows instructors to use a single file in any medium for students to view that file-online courses, assignment pages, enhanced courses and emails. Another benefit to using OneDrive is the ease with which you can update files and not worry about which versions you've shared. Wherever you link them, the documents or files will always be current since you edit a single source file in the OneDrive cloud. Also, you'll find that linking files is much less cumbersome than attaching versions to emails and other communications. As you update your course and the file needs editing, you update the information in one place. Because links all point to that file, students will always see the most recent version. You won't have to hunt down and reattach documents across your teaching landscape.
Instructions for Uploading and Sharing in OneDrive
Create Cloud Folder
- Log into MHCC's OneDrive
- Go to files
- Add new folder
- Label with Course ID (don't label terms)
TIP: Don't label the course term. Why? Update the documents in this folder when changes are needed. This means the documents will instantly be updated anywhere they are linked. Students will always see the current version, and you won't have old versions of the same document cluttering your drive.

Select File and Share
- Locate file to link
- Click share icon on the right or select radio button and choose share at the top
- In pop up window, click arrow to edit share settings

Sharing Settings
- Click Anyone with the link to select that option. The selected option will appear as bold type and will have a check mark on the far right
- Confirm the Can view (as opposed to Can edit) setting is selected
- Apply settings

Confirm Settings
- Confirm file is viewable by anyone with the link
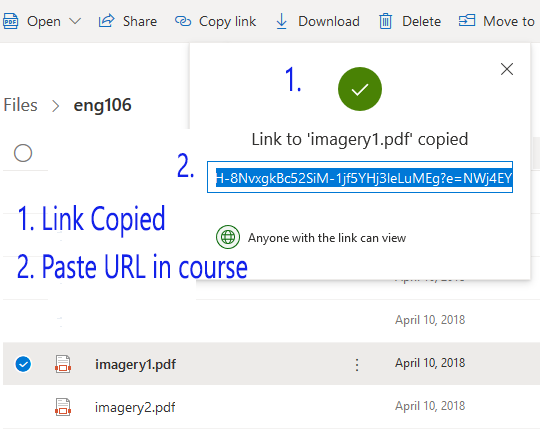
- Click Copy to copy the link to your file

Copy and Paste Document Link
- Look for green check to confirm copied
- Paste copied link in lesson or activity
Video Tutorial of Sharing Link from OneDrive
This video combines several of the steps above to demonstrate the process of setting sharing options and copying the link you wish to share. Video Tutorial of Sharing Link from OneDrive
Sharing with Different Groups
At times you might want to allow others to edit your files. To do this safely, always make a copy of the editable file in a new folder. Keep in mind each shared link you create is unique, so when you change settings, you're doing so for the particular link you create, rather than changing settings on the document. You can share the same document with different groups, allowing them different permissions.
Need help with using OneDrive or other Office Online apps? contact [email protected]
Linking OneDrive Files in Blackboard
Once you have copied your OneDrive file link, it needs to be added to Blackboard using the Web Link tool. To add the link:
- Navigate to the folder or location where the link will be available to students.
- Select the Build Content button at the top of the page and choose Web Link from the menu.
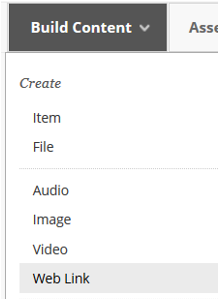
- When the Web Link page opens, give the link a Name that is clear for students, and then paste the OneDrive link in the URL field.

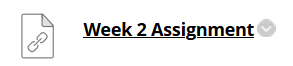
- Submit the page. Your link should now appear in Blackboard.
Welcome to our new home!
Please update your Faculty Resources bookmarksSearch
Related Pages
- Attach Files in Blackboard
- Blackboard Content Editor - Upload Images, Videos, and Files
- Course Schedule
- Course Outcomes - Where to find them and where to put them
- Customize Background Images
- Editing Pages in Blackboard
- Embedding Videos in Blackboard
- How to Properly Add Nested Lists
- Make Links Accessible and Usable
- MHCC Accessible Course Template
- Link to OneDrive Files in your Blackboard Course
- Syllabus Section
- Blackboard Content Editor
- Using Images in Online Pages
- Using Hyperlinks in Blackboard
Improve this Site
If you have a suggestion or would like to report a problem, send us your feedback.